2_Windows and Points
This lesson introduces the basic framework components for creating an application window and rendering a point on the screen.
Interactive CG apps require a lot of processing steps to handle user inputs and produce the graphics we see on our screens. These steps are executed in a sequence in which the outputs from one step become the inputs for the following step. This is called a “pipeline”. The graphics pipeline model we will implement in our framework has these four stages:
- In the Application stage, we create a window for displaying the rendered graphics, load data for the scene, and send the data to the GPU.
- In the Geometry Processing stage, a vertex shader program uses the given data to calculate the positions of all the vertices for each object in the scene.
- In the Rasterization stage, we associate each pixel of the 2D image to be rendered with objects in the 3D scene.
- In the Pixel Processing stage, a fragment shader program uses this data to calculate the final color values of each pixel.
The specific steps of the Application stage are:
- Create a window to read from the GPU framebuffer and display the rendered scene.
- Maintain a loop for checking inputs and animating objects in the scene.
- Run algorithms for physics simulations and collision detection.
- Send updates for vertex attributes and shader source code to the GPU for rendering.
All of the applications we make in these lessons will perform steps 1, 2, and 4 above. The third step is left as an exercise for the intrepid reader who would like to try building physics simulations or interactive games.
In this lesson, we will use Pygame to complete steps 1 and 2 in the section called Creating Windows with Pygame below. A simple example of completing step 4 is then provided in the section called Drawing a Point.
After the Application stage comes the Geometry Processing stage in which a vertex shader program calculates transformations on geometric objects and determines their final coordinates for rendering.
Then, the Rasterization stage creates fragments which hold the color data for each pixel along with raster positions which are coordinates for the pixel in the 2D rendered image.
Finally, the Pixel Processing stage executes a fragment shader program to calculate the final color of each pixel.
We will write a very simple vertex shader program to render a single point and then set its color with an equally simple fragment shader program. The point coordinates and color values will be fixed in the program source code, so we do not need to bother with geometry processing or rasterization at this time.
The components we create in this lesson are the first in our graphics framework that we will develop throughout this course. The framework will follow good software engineering design practices, such as reusability and extensibility as each component follows designed principles such as single responsibility and openness to extension.
Creating Windows with Pygame
The first thing we need for our framework is something to create an application window for the application stage of the graphics pipeline. Here we can use the Pygame library to handle a lot of the work for us. The design of our applications should implement the flow of application logic defined by the application lifecycle:
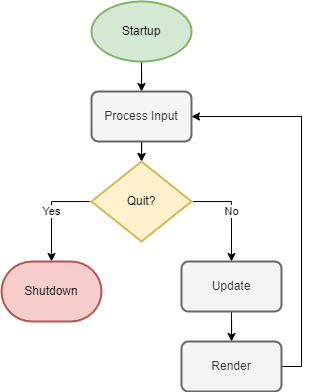
- Startup will load external files, initialize values, and create programming objects
- Main Loop will cycle through tasks that process input from the user, update variables and objects, and render graphics
- Shutdown will cancel any running processes and exit the program
The first component of our graphics framework will be a class called WindowApp that manages the application lifecycle. Let’s create it inside a Python package for the core components of the framework.
The WindowApp Class
![]() Try it!
Try it!
First, make a folder called graphics in your main project directory to store the framework source code. This folder should be in the same place as your virtual environment.
In the graphics folder, create an empty file called __init__.py (with double underscores). This will let you import code from the graphics folder as a Python module.
Inside the graphics folder, create a new folder called core and another empty __init__.py file inside the core folder.
Create one more file called app.py inside core and open the file for editing.
Add the following code to the app.py file.
# graphics/core/app.py
import pygame
import sys
from abc import ABC, abstractmethod

class WindowApp(ABC):
    """A basic application window for rendering 3D graphics."""
    def __init__(self, screen_size=(512, 512)):
        # initialize all pygame modules
        pygame.init()

        # specify rendering details
        display_flags = pygame.OPENGL | pygame.DOUBLEBUF

        # initialize buffers to perform antialiasing
        pygame.display.gl_set_attribute(pygame.GL_MULTISAMPLEBUFFERS, 1)
        pygame.display.gl_set_attribute(pygame.GL_MULTISAMPLESAMPLES, 4)

        # use a core OpenGL profile for cross-platform compatibility
        pygame.display.gl_set_attribute(pygame.GL_CONTEXT_PROFILE_MASK,
                                        pygame.GL_CONTEXT_PROFILE_CORE)

        # create and display the window
        self.screen = pygame.display.set_mode(screen_size, display_flags)

        # set the text that appears in the title bar of the window
        pygame.display.set_caption("Graphics App")

        # manage time-related data and operations
        self.clock = pygame.time.Clock()
This code creates the WindowApp class from which all of our CG apps will be made. We use the abc module to make it an abstract class because it will define two empty methods (startup and update) that all CG apps must implement on their own. Since it is abstract, we cannot create an instance of the WindowApp class directly. Instead, each one of our apps will create a subclass that implements the WindowApp interface.
The initialization method prepares the necessary Pygame modules and buffer settings before creating a window. The window size is set by the screen_size parameter which has a default 512 x 512 resolution. An object for rendering images on screen is then created with the pygame.display.set_mode() method and saved to the self.screen property.
We can specify additional configuration for the display screen with display_flags which we use here to enable double buffering. We can combine flags with the binary OR operator | when we want to use multiple options. For example, we can allow the user to change the size of the window if we combine the double buffering flags with pygame.RESIZABLE like so:
display_flags = pygame.OPENGL | pygame.DOUBLEBUF | pygame.RESIZABLE
(The documentation for pygame.display has more information about display modes.)
The GL_MULTISAMPLEBUFFERS and GL_MULTISAMPLESAMPLES attributes control antialiasing. The number of samples indicates how many times to calculate the color of a pixel at the edge of a polygon. We calculate the color of a pixel with a slight offset so the pixel becomes a blend of the polygon color and the colors around it. This calculation is called “sampling”.
| CG Terms | |
|---|---|
| antialiasing | A technique to make the edges of polygons appear smooth by blending the colors of pixels that render at the edges. |
| double buffering | A technique using two memory buffers to enable smooth transition between frames. The screen displays the frame in one buffer while the graphics engine draws the next frame in the other buffer, then they switch roles when drawing is complete. |
Finally, the pygame.time.Clock object will manage the frames per second (FPS). The main loop of the program will render a new frame everytime it completes a cycle. When running on good PC hardware, this can create an unnecessarily high FPS as the program uses up all the CPU power. Most computer displays only run at 60 Hz which means the image updates only 60 times per second, so we should conserve our CPU and set the FPS of our application to 60 as well.
Next, we will add two empty methods to the WindowApp class which must be implemented by all subclasses. These methods represent the startup step and the main loop’s update step in the application lifecycle. Every new app we create will extend the WindowApp class and implement these two methods to define its specific behavior.
![]() Try it!
Try it!
Add the following code inside the WindowApp class after the __init__() method.
    @abstractmethod
    def startup(self):
        pass

    @abstractmethod
    def update(self):
        pass
The last method we will add to WindowApp is the one that will run the entire application lifecycle from startup to shutdown, including the steps of checking input, updating data, and rendering each frame.
![]() Try it!
Try it!
Add the following code inside the WindowApp class.
    def run(self):
        # control the main loop with a Boolean
        running = True

        # the "startup" process
        self.startup()

        # the main loop
        while running:

            # the "check inputs" process
            # !--not implemented yet--!

            # the "update" process
            self.update()

            # the "render" process
            pygame.display.flip()

            # maintain 60 FPS
            self.clock.tick(60)

        # the "shutdown" process
        pygame.quit()
        sys.exit()
Calling this run method begins the execution of the interactive application. Next let’s create the the Input class which handles the process for checking user inputs.
The Input Class
A separate class will implement the default behavior for handling inputs. For now, that behavior only includes exiting the program when the user closes the window.
![]() Try it!
Try it!
In the core folder, add the following code to app.py just before the WindowApp class:
class Input:
    """Handles the inputs for an app, such as keys from the keyboard."""
    def __init__(self):
        self._quit = False  # whether or not the program should quit

    @property
    def quit(self):
        return self._quit
Here we create an attribute in the Input class called _quit. We want to limit the control of its Boolean value to the Input class only, so we also make a special getter method with the @property decorator. This gives the class a read-only property named quit so other classes can read the value without changing it.
When the user closes a window that has been created with Pygame, Pygame creates a QUIT event and adds it to an event queue. Our Input class will provide a method that checks the event queue and sets self._quit to True when it sees the QUIT event.
![]() Try it!
Try it!
Add the following update method to the Input class.
    def update(self):
        # pygame events come in a list
        for event in pygame.event.get():
            if event.type == pygame.QUIT:  # the close button was clicked
                self._quit = True
Now we can use an instance of Input in our WindowApp class to implement the check inputs process and complete the application’s main loop.
![]() Try it!
Try it!
In the app.py file, scroll down to the __init__ method inside the WindowApp class.
At the end of the __init__ method, create an instance of Input and save it to self.input.
        # handle user inputs
        self.input = Input()
Go to the run method and find the # !--not implemented yet--! comment.
Delete the comment and add the following code under # the "check inputs" process:
            self.input.update()
            if self.input.quit:
                running = False
                break
Testing the WindowApp and Input Classes
Finally, let’s check that everything works together so far with a simple test program. This program will initialize the WindowApp class and run it to see if a window appears on the screen.
![]() Try it!
Try it!
In your main folder, create a file called test_2_1.py.
Inside that file, add the following source code:
# test_2_1.py
from graphics.core.app import WindowApp

class Test_2_1(WindowApp):
    """Tests a basic window for rendering content"""
    def startup(self):
        print("Starting up Test 2-1...")

    def update(self):
        pass

# initialize and run this test
Test_2_1().run()
Save the file and open a terminal in the directory that contains your test_2_1.py file.
Run the test program with the following command:
python test_2_1.py
Click the close button on the window and confirm that the program exits.
In this test, the startup and update methods don’t add any functionality. But we include them here because Test_2_1 extends the WindowApp abstract class and must implement its interface. The next test we write will have more interesting content for these two methods.
Drawing a Point
With OpenGL, we render images on screen by running programs on a special processor designed for graphics called the graphics processing unit (GPU). These programs include a vertex shader program and a fragment shader program which are written in the OpenGL Shading Language (GLSL). Here we will learn how to write simple shaders, link them to run together, and compile them into a program for the GPU. Once we do that, we will then extend our graphics framework with components that can handle these tasks for our CG apps going forward.
The OpenGL Shading Language (GLSL)
GLSL is a programming language with similarities to both C and Python. Like C, we must declare data types for every variable, such as bool, int, and float. In addition to these basic data types, GLSL also has vector data types for storing multiple float values in a single variable. These vector are vec2, vec3, and vec4, for vectors containing 2, 3, and 4 values, respectively. Vectors are useful for storing data related to colors ($r$, $g$, $b$) and coordinates ($x$, $y$, $z$). GLSL also has matrix data types which provide the data structure required for many important CG computations, such as transformations.
We can access values in a vector using either an index or dot notation. For example, if we have a vec4 variable named v, each value can be indicated by its index in the array (v[0], v[1], v[2], v[3]) or with dot notation: (v.x, v.y, v.z, v.w) or (v.r, v.g, v.b, v.a) or (v.s, v.t, v.p, v.q). As a programmer, you are free to decide how you want to access each value. Just remember that dot notation methods are semantically associated with position coordinates $(x, y, z, w)$, colors $(r, g, b, a)$, and texture coordinates $(s, t, p, q)$.
Similar to Python, GLSL has all the basic control structures including if statements, loops, and functions with parameters. However, it uses arrays instead of lists and also provides structs for users to define their own data types.
Each program written in GLSL must have a main function to run, similar to C language. We always declare functions with a return type, which is void for the main function. An example of a simple GLSL program is the vertex shader for our first application. This program specifies a single point on screen and saves its position to a global variable called gl_Position. This variable is defined by the OpenGL library and must be assigned a value in the vertex shader.
# GLSL version 330
void main() {
    gl_Position = vec4(0.0, 0.0, 0.0, 1.0);
}
Here the position of our point is stored as a 4-dimensional vector with coordinates $x$, $y$, $z$, and $w$. The $x$, $y$, and $z$ coordinates describe the locations on each axis. The $w$ coordinate is used for geometric transformations, but we don’t need to worry about that now.
Next, our fragment shader sets the color to use when drawing the point.
# GLSL version 330
out vec4 fragColor;
void main() {
    fragColor = vec4(1.0, 1.0, 0.0, 1.0);
}
The fragColor variable is a 4-dimensional vector of color values $r$, $g$, $b$, and $a$ defined as float values. The range of possible values in shaders is between -1.0 and 1.0 and must have a decimal (that is, we cannot use int values).
Here, the variable fragColor is declared with out which is a type qualifier. This means that the fragColor variable will be sent to the buffer after the fragment shader finishes. In general, the out qualifier shows that a variable will be sent to the next step, and the in qualifier shows that it is received from a previous step. For example, color data can be passed from our application through the color buffer to the vertex shader, then to the fragment shader, and then back to the buffer again for rendering.
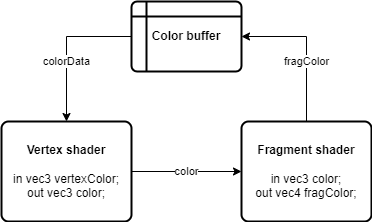
This diagram shows how data flows through the GPU program. The application program can define colorData, send it to the vertex shader as vertexColor, then pass that to the fragment shader as color where it becomes a vec4 called fragColor and goes back to the color buffer for rendering. We will take advantage of this design in the next lesson when we render shapes with multiple colors, but for now our fragment shader defines its own fixed color value and sends it to the buffer.
Compiling GPU Programs
Our first rendered image will show a yellow point on a black background. But before that, let’s build some utilities to handle the common tasks of preparing shaders for a GPU program. We will do this by creating a module called opengl_utils with functions that compile shader code, link shaders, and compile the GPU program. In this module, we use many OpenGL functions from the GL namespace which are prefixed with gl by convention.
![]() Try it!
Try it!
Inside your core folder, create a file called opengl_utils.py.
Open opengl_utils.py and add the following code:
# graphics/core/opengl_utils.py
import OpenGL.GL as GL

def initialize_shader(shader_code, shader_type):
    # specify required OpenGL_GLSL version
    shader_code = f"#version 330\n{shader_code}"

    # create an empty shader object and return its reference value
    shader_ref = GL.glCreateShader(shader_type)
    # load the source code into the shader
    GL.glShaderSource(shader_ref, shader_code)
    # compile the shader
    GL.glCompileShader(shader_ref)

    # check if the shader compile was successful
    compile_success = GL.glGetShaderiv(shader_ref, GL.GL_COMPILE_STATUS)
    if not compile_success:
        # get an error message from the shader as a byte string
        error_message = GL.glGetShaderInfoLog(shader_ref)
        # convert the byte string to a character string
        error_message = f"\n{error_message.decode('utf-8')}"
        # free memory used to store the shader program
        GL.glDeleteShader(shader_ref)
        # raise an exception to top running and print the error message
        raise RuntimeError(error_message)

    # compilation was successful, so return the shader reference
    return shader_ref
Here the initialize_shader function uses glCreateShader to initialize a shader object and get its reference. Then, we load the source code into the shader with glShaderSource and compile the code with glCompileShader. We then check the compiler status to see if it failed with glGetShaderiv. If compilation failed, we get the error message with glGetShaderInfoLog before deleting the shader program with glDeleteShader. Otherwise, our method returns a reference to the shader object.
Next we need a function for linking the shaders and compiling the GPU program.
![]() Try it!
Try it!
Add the next function to the opengl_utils.py file:
def initialize_program(vertex_shader_code, fragment_shader_code):
    # use our previous method to load and compile the shaders
    vertex_shader_ref = initialize_shader(
        vertex_shader_code,
        GL.GL_VERTEX_SHADER
    )
    fragment_shader_ref = initialize_shader(
        fragment_shader_code,
        GL.GL_FRAGMENT_SHADER
    )

    # create an empty program object and get its reference value
    program_ref = GL.glCreateProgram()

    # attach the previously compiled shaders
    GL.glAttachShader(program_ref, vertex_shader_ref)
    GL.glAttachShader(program_ref, fragment_shader_ref)

    # link the vertex shader to the fragment shader
    GL.glLinkProgram(program_ref)

    # check if the program link was successful
    link_success = GL.glGetProgramiv(program_ref, GL.GL_LINK_STATUS)
    if not link_success:
        # get an error message from the program compiler
        error_message = GL.glGetProgramInfoLog(program_ref)
        # convert byte string to a character string
        error_message = f"\n{error_message.decode('utf-8')}"
        # free memory used to store GPU program
        GL.glDeleteProgram(program_ref)
        # raise an exception to stop running and print the error message
        raise RuntimeError(error_message)

    # linking was successful, so return the program reference
    return program_ref
This method uses our initialize_shader function to load and compile the vertex shader and fragment shader from strings of their source code. It then creates an object for the GPU program with glCreateProgram and attaches the shaders to be linked with glAttachShader. Then, glLinkProgram uses the shaders to create the GPU program. Linking the program may fail, so we check its status with glGetProgramiv in a way similar to the initialize_shader function. If linking failed, we use glGetProgramInfoLog to get the error message before deleting the program with glDeleteProgram. Otherwise, the function returns a reference to the program object.
Rendering in the Application
Finally, we can create an application that renders a point using the functions in our opengl_utils module and a few others from the OpenGL library.
A typical application will follow these steps in its startup process:
- Store vertex attributes in GPU memory buffers called vertex buffer objects (VBOs).
- Send vertex shader and fragment shader source code to the GPU.
- Compile and load the shader source code.
- Link vertex data in VBOs to variables in the the vertex shader.
In our applications, we do these steps in a method called startup which is defined in the WindowApp class as an empty method. We must implement the method in each of our apps that extend the WindowApp class. We use special objects called vertex array objects (VAOs) to hold associations between data in buffers (VBOs) and their shader variables. OpenGL apps often require at least one VAO, but VBOs are optional. This first app simply hard-codes the vertex and color data directly in the GLSL code itself so we don’t need to set up any buffers (VBOs).
![]() Try it!
Try it!
In your main project folder, create a new file called test_2_2.py.
Open the test_2_2.py file and add the following code:
# test_2_2.py
import OpenGL.GL as GL

from graphics.core.app import WindowApp
from graphics.core.opengl_utils import initialize_program

class Test_2_2(WindowApp):
    """Test compiling and linking a GPU program by rendering a single point"""
    def startup(self):
        print("Starting up Test 2-2...")

        # vertex shader code as a string
        vs_code = """
        void main() {
            gl_Position = vec4(0.0, 0.0, 0.0, 1.0);
        }
        """

        # fragment shader code as a string
        fs_code = """
        out vec4 fragColor;
        void main() {
            fragColor = vec4(1.0, 1.0, 0.0, 1.0);
        }
        """

        # compile the GPU program and save its reference
        self.program_ref = initialize_program(vs_code, fs_code)

        # create and bind vertex array object (VAO)
        vao_ref = GL.glGenVertexArrays(1)
        GL.glBindVertexArray(vao_ref)

        # (optional) set point size (width and height in pixels)
        GL.glPointSize(10)

    def update(self):
        # select program to use when rendering
        GL.glUseProgram(self.program_ref)

        # render geometric objects using the selected program
        GL.glDrawArrays(GL.GL_POINTS, 0, 1)

# initialize and run this test
Test_2_2().run()
Save the file and open a terminal in the folder with your test_2_2.py file.
Run the test program with the following command:
python test_2_2.py
Confirm that the program displays a yellow dot in the center of the window.
This test application once again inherits from our WindowApp class. It implements the startup method to run its startup procedure and the update method to run in the main loop.
The startup method directly stores the source code for the shaders as multi-line strings and uses our initialize_program function to compile and link the GPU program. Then it gets a VAO with glGenVertexArrays and binds it for use with glBindVertexArray. The last line of this method changes the size of the point with glPointSize so that it is easier to see. Here, the parameter of 10 means the point will be 10 pixels wide and 10 pixels tall.
In the update method, we use glUseProgram to specify our program for use in the render process. Then glDrawArrays draws the point on the screen using our program.
This was a lot of work, but we now have a good foundation for building more complicated CG apps. Next time we will look at the basics of rendering 2-dimensional shapes of different colors. Look forward to it!