8_The Scene Graph
This lesson explains the scene graph structure for representing 3D scenes that contain several objects. We implement fundamental components for the CG framework to render various 3D objects, the scene itself, and a camera to view it all.
The Scene Graph Framework
Now that we have enough core components in our graphics framework, we can begin building 3D scenes. The primary structure of our framework is the scene graph which is a tree-like data structure that connects all objects in a hierarchical graph. Each object is a node in the graph and has its own place in the hierarchy. The top node from which all other nodes extend is called the root node. A node that extends from another node is called a child node and the node from which it extends is called its parent node.
As an example, consider modelling the planets of our solar system revolving around the Sun. The scene graph might look something like this:
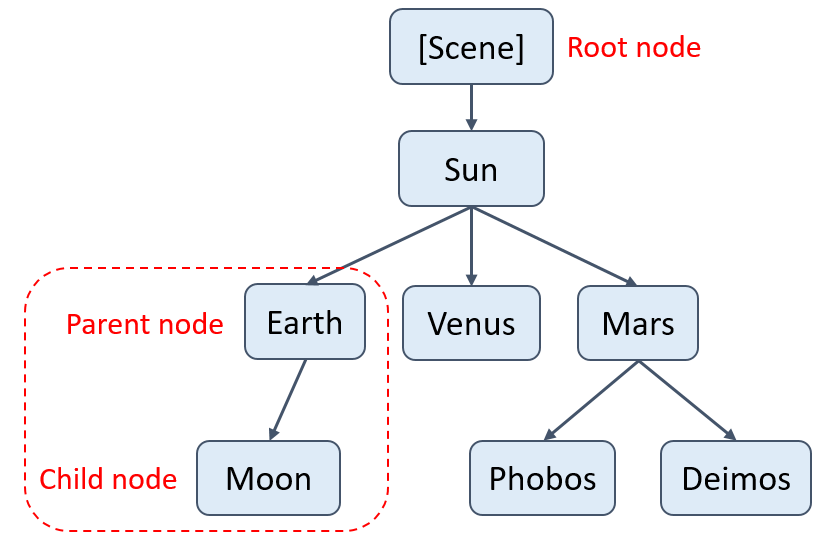
The scene itself is the root node and the Sun is its direct child. All the planets then are children of the Sun node since they revolve around the Sun. We can further add celestial bodies to their respective positions in the scene graph. For example, moons would be children of the planets around which they revolve. In a scene graph, the ancestor nodes of a given node include every parent node along the path that connects that node to the root node. Likewise, the descendants of a node are all the child nodes that extend from it. In this example, the ancestors of the Moon are the Earth, Sun, and Scene nodes. Meanwhile the descendants of the Sun include all of the planet nodes and moon nodes.
As mentioned in the lesson on Local Transformations, the global transformation of an object is calculated by accumulating all the individual scaling, rotation, and translation transformations applied to the object. These transformations are composed into a single model matrix for the object. In a scene graph, we only need to store the model matrix of a node relative to its parent node. Then, we can calculate the global transformation of the object as the product of its own model matrix with the model matrices of all its ancestors. For example, the Moon’s model matrix would represent transformations relative to the Earth while the Earth’s model matrix would represent transformations relative to the Sun. We then calculate the world transform of the Moon by recursively combining the model matrices of the Moon, Earth, and Sun. How convenient!
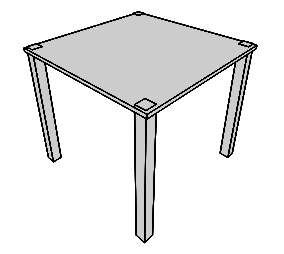
We can also group together nodes in a scene graph when we want to collectively transform them. For example, a basic table might be a long, flat box for the surface and four tall, narrow boxes for the legs. Then we can arrange these five boxes relative to each other as children of a “table” group node. Any transformations applied to the group node will then apply to the table as a whole.
Now let’s take a look at the classes we will use to construct our scene graph.
Overview of Class Structure
The base class for every node will be called Object3D since it represents any object in three-dimensional space. The class will hold the object’s model matrix (named transform), a reference to its parent object, and a list of references to children objects.
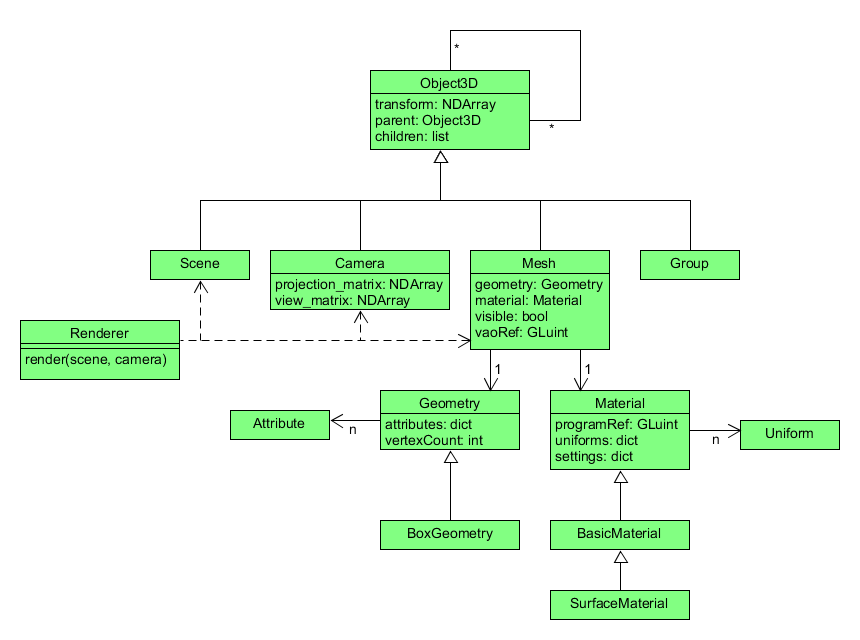
Then, the Scene, Camera, Group, and Mesh classes represent different types of 3D objects with different purposes, so they are subclasses of the Object3D class.
The Scene class will enforce a no-parent rule to ensure that it will always be the root node of the scene graph.
The Camera class stores a projection matrix and a view matrix which are used to transform world objects based on the position and direction of the viewer.
The Group class is for making a shared parent node for several objects combined into a group, as described in the table example above.
Compared to Object3D, it actually has no additional functionality.
We only create it so that we have a semantic parent node for groups of child nodes.
The Mesh class represents objects that are visibly rendered.
It will manage data about the object’s geometry and appearance, including the object’s vertices, its shader program, and the vertex array object (VAO) that binds them together.
Geometry data will be encapsulated in the Geometry class which manages a mesh’s vertex data using Attribute objects.
Appearance data will be encapsulated in the Material class which manages Uniform objects and OpenGL render settings for the mesh.
For example, in the next lesson we will create a BoxGeometry class and a SurfaceMaterial class from these base classes to render a spinning cube and demonstrate how all these classes work together.
Finally, the Renderer class collects every mesh in a scene and applies the matrices from a given camera to render the final image.
In addition to rendering every viewable mesh, Renderer also manages OpenGL settings for depth testing, antialiasing, and clearing the frame.
Now let’s start coding these classes!
3D Objects
The Object3D class implements the logic for a node in a tree graph structure.
It must have the ability to add and remove other nodes as children.
We will also implement the rule that each object can only have a single parent at a time.
![]() Try it!
Try it!
In your graphics/core folder, create a new file called scene_graph.py.
Open scene_graph.py for editing and add the following code:
# graphics/core/scene_graph.py
from graphics.core.matrix import Matrix

class Object3D:
    """A node in the scene graph tree structure"""
    def __init__(self):
        self._transform = Matrix.identity()
        self._parent = None
        self._children = []

    @property
    def parent(self):
        return self._parent

    @parent.setter
    def parent(self, node):
        """Set or remove the parent of this node"""
        if not isinstance(node, Object3D) and node is not None :
            raise TypeError("Parent node must be an instance of Object3D.")
        if self._parent is not None and node is not None:
            raise RuntimeError("Cannot replace an existing parent.")
        self._parent = node

    def add(self, child):
        """Add an object as the child to this object in the scene graph"""
        if not isinstance(child, Object3D):
            raise TypeError("Child node must be an instance of Object3D.")
        child.parent = self
        self._children.append(child)

    def remove(self, child):
        """Remove a child object from this object"""
        self._children.remove(child)
        child.parent = None
In order for our scene graph to function properly, each node can only have a single parent node.
We enforce this rule by creating a setter for the parent property which will run whenever a program tries to assign a new value to the parent property.
We can remove the parent by calling this setter with the None value for the new parent.
Otherwise, if parent already has a value and the new value is not None, we raise an exception to explain the problem.
Add the next code to the Object3D class for accessing an object’s global transformation matrix and all its descendants.
    @property
    def world_matrix(self):
        """Calculate the transformation of this node relative to the root node"""
        if self._parent is None:
            return self._transform
        else:
            # recursion!
            return self._parent.world_matrix @ self._transform

    @property
    def descendant_list(self):
        """Get a single list containing all the descendants of this node"""
        descendants = [self]
        for child in self._children:
            # more recursion!
            descendants += child.descendant_list
        return descendants
The world_matrix property will recursively apply its transformation matrix to each of its ancestors’ matrices until it reaches a node with no more ancestors (the root node).
At that point it returns the final product.
The descendant_list property similarly uses recursion to build a list containing this node and every node that extends from this one in the graph.
Next, add this code to the Object3D class for applying both local and global transformations.
    def apply_matrix(self, matrix, local=True):
        """Apply a geometric transformation to this object"""
        if local:
            self._transform = self._transform @ matrix
        else:
            self._transform = matrix @ self._transform

    def translate(self, x, y, z, local=True):
        """Apply a translation along <x, y, z>"""
        mat = Matrix.translation(x, y, z)
        self.apply_matrix(mat, local)

    def rotate_x(self, angle, local=True):
        """Apply a rotation in radians around the x-axis"""
        mat = Matrix.rotation_x(angle)
        self.apply_matrix(mat, local)

    def rotate_y(self, angle, local=True):
        """Apply a rotation in radians around the y-axis"""
        mat = Matrix.rotation_y(angle)
        self.apply_matrix(mat, local)

    def rotate_z(self, angle, local=True):
        """Apply a rotation in radians around the z-axis"""
        mat = Matrix.rotation_z(angle)
        self.apply_matrix(mat, local)

    def scale_uniform(self, s, local=True):
        """Apply a uniform scaling transformation to this object"""
        mat = Matrix.scale(s, s, s)
        self.apply_matrix(mat, local)
First, we make a generic apply_matrix method which accepts a transformation matrix as its first parameter and an optional Boolean as its second parameter.
A True value for the Boolean indicates that the transformation is local to the object’s coordinate axes.
Otherwise, we apply the matrix as a global transformation.
Then, each transformation method uses apply_matrix to apply a specific type of transformation matrix to the object.
Finally, add this code to the Object3D class for getting and setting the position of an object.
    @property
    def position(self):
        """Get the position of this object relative to its parent node"""
        return [self._transform.item((0,3)),
                self._transform.item((1,3)),
                self._transform.item((2,3))]

    @position.setter
    def position(self, position):
        """Set the position of this object relative to its parent node"""
        if not isinstance(position, (list, tuple)) or len(position) != 3:
            raise ValueError("Value for position must be in the form (x,y,z)")

        self._transform[0][3] = position[0]
        self._transform[1][3] = position[1]
        self._transform[2][3] = position[2]

    @property
    def world_position(self):
        """Get the position of this object relative to the root node"""
        world_matrix = self.world_matrix
        return [world_matrix.item((0,3)),
                world_matrix.item((1,3)),
                world_matrix.item((2,3))]
Make sure there are no errors and save the file.
Here, the position and world_position properties both use a Numpy array method called item().
This method returns the value inside the NDArray matrix at the given location.
Remember, we use a 4x4 matrix to represent 3D transformations and the numbers in the first three rows (indices 0, 1, and 2) of the last column (index 3) are the translation values for $x$, $y$, and $z$.
So, we just extract the values from these indices and return them as the object’s position.
The position setter uses standard array notation to insert values into a NDArray matrix.
In this way, we can directly set the position of an object without applying a translation matrix.
Scene and Group
The Scene and Group classes have very little additional functionality, but they are conceptually important to our scene graph structure.
The Scene class is the root node of the scene graph, so it will not accept any node as a parent.
We will use the Group class to store transformations that we want to apply to many objects together as a whole. For example, a bundle of balloons would not have a visible parent object but each balloon would need the same transformation matrix when the bundle moves. We could apply the translation matrix to each balloon individually, or we could apply the matrix to an instance of Group that has each balloon as a child.
![]() Try it!
Try it!
Open the scene_graph.py file in your core folder and go to the end of the file.
Add the following code after the last code of the Object3D class:
class Scene(Object3D):
    """Represents the root node of the scene graph tree structure"""
    def __init__(self):
        super().__init__()

    @Object3D.parent.setter
    def parent(self, node):
        if node is not None:
            raise RuntimeError("The root node cannot have a parent.")
Make sure there are no errors and save the file.
This time, we use a special decorator (@Object3D.parent.setter) to override the setter for the parent property in the Object3D superclass.
Then we raise an exception if a program tries to assign a parent node to the scene node.
Add the following code after the last code of the Scene class:
class Group(Object3D):
    """An invisible parent node for a collection of child nodes"""
    def __init__(self):
        super().__init__()
Make sure there are no errors and save the file.
Camera
In the real world, a camera is a physical object with a position and orientation that change relative to the world around it. In 3D CG the relationship between the camera and the world is a little different. The camera itself is not rendered, but instead represents the perspective of the viewer. From the viewer’s perspective, camera movements appear as if the entire world is moving and the viewer is staying still. Indeed, since the computer screen doesn’t move, we can think of camera movements as global transformations applied to the entire scene.
But if camera movements apply to the scene instead of the camera itself, that means we need to handle the camera’s global transformations a little differently. For example, when the camera moves two units to the right, all of the objects in the world appear to move two units to the left. When the camera rotates 90° clockwise, the rest of the world appears to rotate 90° counterclockwise. The scene’s movements are the inverse of the camera’s movements!
To that end, we will store the position and orientation of the camera separately as a view matrix which we calculate to be the inverse of the camera’s global transform matrix.
In addition to the view matrix, we will also use the Camera class to manage the projection matrix for transforming the scene’s world coordinates to coordinates in the clipping space.
![]() Try it!
Try it!
Open scene_graph.py and add the following code to the imports at the top of the file:
from numpy.linalg import inv
Next, scroll to the bottom of scene_graph.py and add the following code after the last code of the Group class.
class Camera(Object3D):
    """Represents the virtual camera used to view the scene"""
    def __init__(self, angle_of_view=60, aspect_ratio=1, near=0.1, far=1000):
        super().__init__()
        self._projection_matrix = Matrix.perspective(
            angle_of_view, aspect_ratio, near, far
        )
        self._view_matrix = Matrix.identity()

    @property
    def projection_matrix(self):
        return self._projection_matrix

    @property
    def view_matrix(self):
        self._view_matrix = inv(self.world_matrix)
        return self._view_matrix
Make sure there are no errors and save the file.
Mesh
The Mesh class represents objects that can be rendered in the scene. It will combine two essential classes for managing rendered objects: the Geometry class handles vertex data and the Material class handles appearance data. We will complete those two classes in the next lesson, but for now we can make empty classes as placeholders.
![]() Try it!
Try it!
In your graphics folder, create a new folder called geometries.
In the geometries folder, create two new files called __init__.py and geometry.py.
Open __init__.py and add the following code:
# graphics/geometries/__init__.py
from graphics.geometries.geometry import *
This will allow us to import our Geometry class directly from the geometries module without needing to know the specific sub-module.
Over the next few lessons we will create several kinds of geometries in different sub-modules, so this shortcut will be convenient when programming our apps.
Open geometry.py and add the following code:
# graphics/geometries/geometry.py
from graphics.core.openGL import Attribute

class Geometry:
    """Manages vertex data and attribute variables"""
    pass
Make sure there are no errors and save the file.
In your graphics folder, create a new folder called materials.
In the materials folder, create two new files called __init__.py and material.py.
Open __init__.py and add the following code:
# graphics/materials/__init__.py
from graphics.materials.material import *
Open material.py and add the following code:
# graphics/materials/material.py
import OpenGL.GL as GL

from graphics.core.openGLUtils import initialize_program
from graphics.core.openGL import Uniform

class Material:
    """Manages shader program references, uniform variables, and OpenGL render settings"""
    pass
Make sure there are no errors and save the file.
Now we can create the Mesh class with Geometry and Material even though they are not fully implemented.
Open the scene_graph.py file again from inside the core folder.
At the top of the scene_graph.py file, add the following code to the import statements:
import OpenGL.GL as GL

from graphics.geometries import Geometry
from graphics.materials import Material
At the end of the scene_graph.py file, add the following code after the last code of the Camera class:
class Mesh(Object3D):
    """A visible object in the scene with geometry and appearance data"""
    def __init__(self, geometry, material):
        super().__init__()

        if not isinstance(geometry, Geometry):
            raise ValueError(f"Expected an instance of Geometry but got {type(geometry)} instead.")
        self._geometry = geometry

        if not isinstance(material, Material):
            raise ValueError(f"Expected an instance of Material but got {type(material)} instead.")
        self._material = material

        self._visible = True

        self._vao_ref = GL.glGenVertexArrays(1)
        GL.glBindVertexArray(self._vao_ref)

        # associate geometry attributes to the material's shader program
        for variable, attribute in geometry.attributes.items():
            attribute.associate_variable(material.program_ref, variable)

        # unbind this vertex array object
        GL.glBindVertexArray(0)

    @property
    def visible(self):
        return self._visible

    @visible.setter
    def visible(self, value):
        self._visible = bool(value)
Since this class heavily relies on the interfaces we will create in Geometry and Material, we use the __init__() method to make sure that we get instances of those two classes.
We also make a visible property so we can easily indicate that this object should be rendered.
The shader program will be stored in Material but the vertex attributes are stored in Geometry.
The Mesh class manages the connection between the two by maintaining the VAO that associates attribute data to shader program variables.
A reference to a unique VAO for this mesh is stored in the self._vao_ref property so that we can easily keep track of the bindings for each 3D object and draw multiple different objects on the screen.
Notice that the Geometry instance has a property called attributes which stores pairs of shader variables and their associated attributes.
We will implement this later when we complete the Geometry class.
Next, add the following code to the Mesh class for rendering the 3D object.
    def render(self, view_matrix, projection_matrix):
        """Updates data and settings before drawing this 3D object"""
        GL.glUseProgram(self._material.program_ref)

        GL.glBindVertexArray(self._vao_ref)

        # update matrix uniforms
        self._material.set_uniform("modelMatrix", self.world_matrix)
        self._material.set_uniform("viewMatrix", view_matrix)
        self._material.set_uniform("projectionMatrix", projection_matrix)

        # update the stored data and OpenGL settings before drawing
        self._material.upload_data()
        self._material.update_render_settings()
        GL.glDrawArrays(self._material.get_setting("drawStyle"), 0,
                        self._geometry.vertex_count)

        GL.glBindVertexArray(0)
Make sure there are no errors and save the file.
The render() method will apply the model matrix, view matrix, and projection matrix before updating OpenGL render settings and drawing the object. It uses properties and methods from the Material and Geometry classes which we will complete next time. For now, we can see that Mesh controls the VAO and render process for drawing this object while Material handles the shader program, the uniform variables for transformation matrices, and OpenGL render settings such as draw style.
There is still much more we need to add next time before we can render a 3D object, so look forward to it!