10_Polygons, Planes, Spheres, and Cylinders
In this lesson, we add more tools to our geometry toolset with the introduction of a polygon geometry class and a parametric geometry class. Then, we use those classes to create various planes, ellipsoids, and cylindrical geometries.
As we build 3D scenes, we will need to use a variety of different geometries to make different kinds of objects.
Last time we created classes for basic rectangles and boxes, but those alone will not be enough.
Other types of objects that are necessary for complex 3D scenes include polygons, spheres, ellipsoids, cylinders, cones, prisms, and pyramids.
This lesson introduces a PolygonGeometry class that can render 2D shapes with any number of sides that are equal lengths.
Then, we create a ParametricGeometry class which allows us to use parametric functions to render segmented surfaces in 3D.
The capabilities of the ParametricGeometry class provide the necessary foundation for creating ellipsoids, spheres, cylinders, prisms, pyramids, and cones.
We can easily create classes for each of those geometries by extending the ParametricGeometry class and specifying the parametric functions that calculate the vertices of their geometric surfaces.
Polygons
Our PolygonGeometry class will provide the ability to render regular polygons which are 2D shapes with equal sides and angles.
Regular polygons include equilateral triangles (3 sides), squares (4 sides), pentagons (5 sides), hexagons (6 sides), heptagons (7 sides), octagons (8 sides), and so on.
If we were to draw a circle around a regular polygon so that it shares the same radius and diameter as the polygon, we would see that each corner of the polygon is equally spaced along the circumference of the circle. This implies that we can use the functions for defining a circle to get the points of a regular polygon. Recall that previously we defined the circular path of a moving triangle with $x=r\cdot\cos(t)$ and $y=r\cdot\sin(t)$ where $t$ is a value in radians. These are the parametric functions for specifying the coordinates that lie on the circumference of a circle. When the number of points is small and we draw straight lines between each consecutive point, we get common polygons such as hexagons (6 points) and octagons (8 points). As the number of points increases, we get shapes that look closer and closer to a circle (imagine 32 points, for example).
Since shapes are drawn in OpenGL with triangles that define their vertices in counterclockwise order, we should draw each regular polygon as a series of triangles that all share a center point. The image below shows how we can do this by dividing the polygon into equal slices like a pizza. We can see that the number of slices is the same as the number of sides for the polygon as well as the number of vertices. For an octogon with eight sides like the one pictured below, the angle of every slice is $\theta=\frac{2\pi}{8}=\frac{\pi}{4}$ and the equations for the circumference of the circle give us the vertices,
\[\begin{aligned} P_0 &= (r\cdot\cos(\frac{\pi}{4}),r\cdot\sin(\frac{\pi}{4})) \\ P_1 &= (r\cdot\cos(\frac{\pi}{2}),r\cdot\sin(\frac{\pi}{2})) \\ P_2 &= (r\cdot\cos(\frac{3\pi}{4}),r\cdot\sin(\frac{3\pi}{4})) \\ ... \\ P_7 &= (r\cdot\cos(2\pi),r\cdot\sin(2\pi)) \end{aligned}\]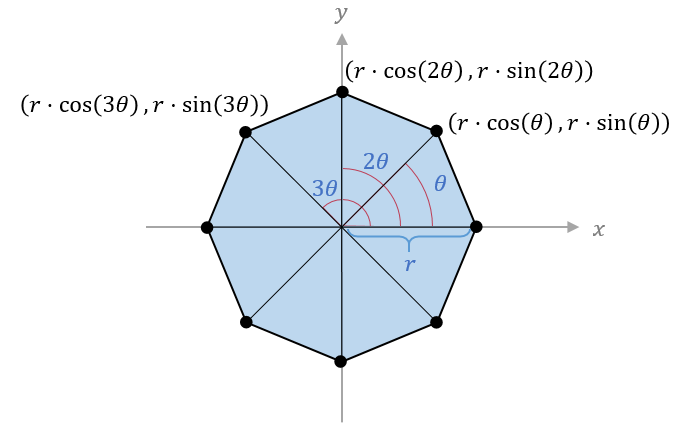
To make triangles for OpenGL, we need to list these points as vertices in sets of three and arrange them in counterclockwise order relative to the front side of the polygon.
The initialization method for the PolygonGeometry class will do this after calculating all the vertices of the polygon from the given radius and number of sides.
![]() Try it!
Try it!
Inside the graphics/geometries folder, open the file called basic_geometries.py and add the following import statement to the top of it.
from math import sin, cos, pi
Scroll to the end of basic_geometries.py and add the following after the last code of the BoxGeometry class:
class PolygonGeometry(Geometry):
    """A regular polygon with the given number of sides and radius"""
    def __init__(self, sides=3, radius=1):
        super().__init__()

        # the center angle of each slice
        theta = 2 * pi / sides
        position_data = []
        color_data = []

        find_x = lambda s: radius*cos(s*theta)
        find_y = lambda s: radius*sin(s*theta)

        for n in range(sides):
            # calculate the vertices for the triangle of side n
            position_data += [
                (0, 0, 0),
                (find_x(n), find_y(n), 0),
                (find_x(n+1), find_y(n+1), 0)
            ]
            # the center is white, the sides interpolate between red and blue
            color_data += [(1, 1, 1), (1, 0, 0), (0, 0, 1)]

        self.set_attribute("vertexPosition", position_data, "vec3")
        self.set_attribute("vertexColor", color_data, "vec3")
        self.count_vertices()
Make sure there are no errors and save the file.
The PolygonGeometry class inherits from the Geometry class, so it already has everything it needs to manage its own Attribute objects.
After calculating the vertices, we set attribute data for the vertexPosition and vertexColor shader variables to use when rendering this polygon.
Since the __init__ method has the parameters sides and radius, it is easy to create any kind of regular polygon we like.
For example, sides=5 will create a pentagon, sides=6 will create a hexagon, and so on.
In an app, the code for this might look like the following:
pentagon = PolygonGeometry(sides=5)
hexagon = PolygonGeometry(sides=6)
The PolygonGeometry class will become very useful later when we need to fill in the flat ends of cylinder and cone geometries.
Parametric Geometries
For polygons, we used functions to find the $x$ and $y$ coordinates of each vertex for each given side. Parametric functions similar to these can be used to calculate a variety of different surfaces in 3D. The simplest of such 3D surfaces might be a plane where the $z$ coordinates of each vertex are calculated directly from the $x$ and $y$ coordinates, as expressed by $z=f(x,y)$. In this case however, there is no function $f$ that can produce $z$ coordinates for shapes like spheres and cylinders because those shapes have multiple vertices that share the same $x$ and $y$ coordinates. Instead of calculating $z$ from $x$ and $y$, it is better to use two variables $u$ and $v$ with fixed ranges that represent the lateral and longitudinal dimensions of the surface. Then, the three coordinates $x$, $y$, and $z$ can be defined by $u$ and $v$ like so:
\[x=f(u,v) \text{,} \hspace{1cm} y=g(u,v) \text{,} \hspace{1cm} z=h(u,v)\]In this way, the parametric function $S$ graphs output values $(x,y,z)$ from a region of inputs defined by the ranges of $u$ and $v$ values.
\[S(u,v) = (x,y,z) = \left( f(u,v), g(u,v), h(u,v) \right)\]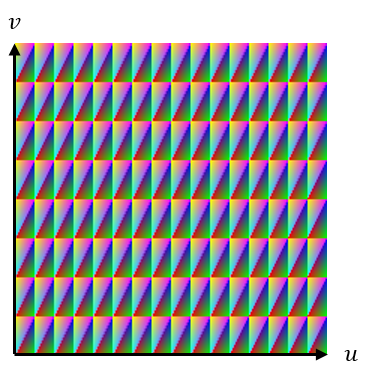
The surface above can be defined by $S(u,v) = (u,v,0)$ where each value of $u$ and $v$ maps directly to the $x$ and $y$ coordinates. The resulting vertices give us a square plane at $z=0$. We can further define more complicated functions for $S$ to map the same values of $u$ and $v$ to the vertices of more complicated shapes such as spheres and cylinders.
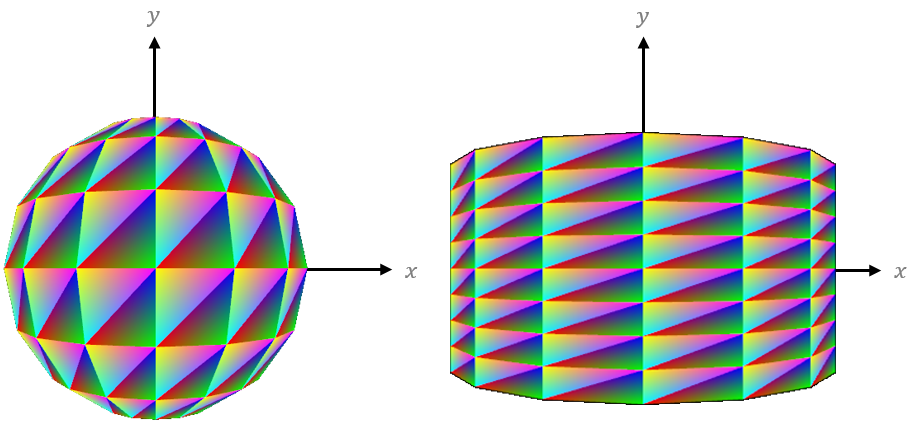
The plane, sphere, and cylinder in the images above show their surfaces drawn with triangles that are calculated from sampling the ranges of $u$ and $v$ at fixed intervals. Here, the number of samples taken in each range is the resolution and the step between samples is the delta. Each parametric geometry will receive parameters for the start and stop values of the ranges $u$ and $v$ as well as the respective resolutions. Another parameter will specify the surface function which defines the shape of the surface. When initialized, the geometry will calculate all the points along its surface by executing the function with every pair of sample values in the ranges $u$ and $v$. Let’s see how this works in code.
![]() Try it!
Try it!
Inside the graphics/geometries folder, create a new file called parametric_geometries.py.
Open the __init__.py file in the graphics/geometries folder and add the following code:
from graphics.geometries.parametric_geometries import *
Open parametric_geometries.py for editing and add the following code:
# graphics/geometries/parametric_geometries.py
import numpy as np

from graphics.geometries.geometry import Geometry

class ParametricGeometry(Geometry):
    """A surface rendered from the given function with parameters u and v"""
    def __init__(self, u_start, u_stop, u_resolution,
                       v_start, v_stop, v_resolution, surface_function):
        super().__init__()

        # generate a matrix of points for all (u,v) values
        point_matrix = []
        for u in np.linspace(u_start, u_stop, u_resolution + 1):
            matrix_row = []
            for v in np.linspace(v_start, v_stop, v_resolution + 1):
                matrix_row.append(surface_function(u,v))
            point_matrix.append(matrix_row)
The __init__ function accepts the minimum and maximum values for the ranges of $u$ and $v$, defined by u_start, u_stop, v_start, and v_stop.
In Python, we can store functions in variables for later reference like any other value.
For example, we did this with the simple lambda functions find_x and find_y in our PolygonGeometry class above.
For parametric geometries, we can receive a Python function that calculates vertex coordinates from $u$ and $v$ values in the surface_function parameter.
Then we can call it like any other function with the code surface_function(u, v).
This module imports a function called linspace from NumPy which gives us a range of sample values for $u$ and $v$ with their given resolutions.
We use a nested for loop to run through every pair of $(u,v)$ sample values and pass them to the surface function. The results are stored in a matrix of coordinate data where the location of each vertex in the matrix reflects the order in which it was calculated.
Next add the following code to the __init__ method of the ParametricGeometry class:
        # store vertex data
        position_data = []
        color_data = []

        # default vertex color data: red, green, blue, cyan, magenta, yellow
        C1, C2, C3 = [1, 0, 0], [0, 1, 0], [0, 0, 1]
        C4, C5, C6 = [0, 1, 1], [1, 0, 1], [1, 1, 0]

        # store vertices for each rectangular segment as a pair of triangles
        for n in range(u_resolution):
            for m in range(v_resolution):
                P1 = point_matrix[n + 0][m + 0]
                P2 = point_matrix[n + 1][m + 0]
                P3 = point_matrix[n + 1][m + 1]
                P4 = point_matrix[n + 0][m + 1]
                position_data += [P1,P2,P3, P1,P3,P4]
                color_data += [C1,C2,C3, C4,C5,C6]

        self.set_attribute("vertexPosition", position_data, "vec3")
        self.set_attribute("vertexColor", color_data, "vec3")
        self.count_vertices()
Make sure there are no errors and save the file.
This part of the __init__ method defines vertices for the pair of triangles that make up each segment of the surface.
We do this in a way similar to the RectangleGeometry class from the previous lesson.
This time, the points for each vertex come from the point_matrix and the vertices for each rectangular segment are stored in position_data and color_data in the order that they will be drawn.
Now we have a strong foundation for creating parametric geometries. Every new geometry we make from now on will simply require a unique surface function and specific parameters for the ranges $u$ and $v$.
Planes
A plane is the simplest parametric object.
Its function directly maps $u$ and $v$ values to $x$ and $y$ coordinates as in $S(u,v) = (u,v,0)$.
When rendered, it looks just like a RectangleGeometry instance, except it is tiled with a number of smaller rectangles defined by the resolutions of $u$ and $v$.
Let’s create a PlaneGeometry class that renders a plane with its center at the origin.
We will refer to the range of $u$ as the width and the range of $v$ as the height so it is easier to imagine.
![]() Try it!
Try it!
Inside the parametric_geometries.py file, add the following after the last code of the ParametricGeometry class:
class PlaneGeometry(ParametricGeometry):
    """A 2D plane divided into segments"""
    def __init__(self, width=1, height=1, width_segments=8, height_segments=8):
        # the surface function S(u, v) = (u, v, 0)
        surface_function = lambda u, v: (u, v, 0)

        # width and height relative to the center at the origin
        w, h = width/2, height/2

        super().__init__(
            u_start=-w,
            u_stop=w,
            u_resolution=width_segments,
            v_start=-h,
            v_stop=h,
            v_resolution=height_segments,
            surface_function=surface_function
        )
Make sure there are no errors and save the file.
When we define a plane, we can set its width and height as well as its segmentation along each dimension.
We then define the surface function using a special Python feature called lambda.
Lambda functions are small anonymous functions that only evaluate a single expression.
Here, our function lambda u, v: (u, v, 0) takes values from the two parameters u and v then returns a tuple containing those values and a 0.
In this way we can easily represent the parametric function $S(u,v)=(u,v,0)$.
With our surface function defined, we just call the __init__ method on the superclass ParametricGeometry with the appropriate parameters.
Since the plane will be centered at the origin, the range of $u$ and $v$ values are calculated from the width and height similar to the way we calculated vertices for the RectangleGeometry.
Ellipsoids
Round shapes such as spheres are essentially made up of several circles of different sizes stacked up along the center axis (called cross-sections). The radius of the circular cross-section at the center of a sphere is equal to the radius of the sphere itself. At the top and bottom of the sphere, the radius of the cross-section is $0$. Every other cross-section has a radius somewhere in between the radius of the sphere and $0$. If we imagine only drawing lines for the radius of each cross-section, the resulting shape would be a half-circle from the top of the sphere to the bottom. Here we can use a parametric function $S(u,v)=(x,y,z)$ where $u$ is the range of $\theta$ values for the cross-sections and $v$ is the range of $\theta$ for the half-circle of the cross-section radii. Then, the range of values for $u$ will be $0\le u\le 2\pi$ and the range of values for $v$ will be $-\frac{\pi}{2} \le v \le \frac{\pi}{2}$.
Assuming a sphere centered on the $y$-axis with radius $1$ and the radius of each cross-section defined as $r_c$, we can say $x=r_c\cdot\sin(u)$, $y=\sin(v)$, and $z=r_c\cdot\cos(u)$ where $0\le u\le 2\pi$ and $-\frac{\pi}{2} \le v \le \frac{\pi}{2}$. Then, the cross-section radius $r_c=1$ when $y=0$ and $r_c=0$ when $y=1$ or $y=-1$. The table below shows the relationship between these values from which we can deduce that $r_c=cos(v)$.
| $v$ | $y$ | $r_c$ |
|---|---|---|
| $-\frac{\pi}{2}$ | -1 | 0 |
| 0 | 0 | 1 |
| $\frac{\pi}{2}$ | 1 | 0 |
Putting this all together we can see our parametric function for a sphere is:
\[S(u,v) = \left( \cos(v)\cdot\sin(u), \sin(v), \cos(v)\cdot\cos(u) \right) \\ \text{where } 0\le u\le 2\pi \text{, and } -\frac{\pi}{2} \le v \le \frac{\pi}{2}\]Given that this function gives us the coordinates for a perfect sphere of radius $1$, we can create an ellipsoid by simply multiplying the $x$, $y$, and $z$ coordinates by the dimensions of width, height, and depth, respectively.
Now let’s write an EllipsoidGeometry class with its center at $(0,0,0)$ based on everything we just defined.
![]() Try it!
Try it!
Inside the parametric_geometries.py file, add the following import to the top of the file:
from math import sin, cos, pi
Scroll to the end of the parametric_geometries.py file and add the following code after the PlaneGeometry class:
class EllipsoidGeometry(ParametricGeometry):
    """A unit sphere with dimensions scaled by the given width, height, and depth"""
    def __init__(self, width=1, height=1, depth=1,
                       radial_segments=32, height_segments=16):
        # the surface function calculates points on the surface
        # S(u,v) = (w/2 cos(v) sin(u), h/2 sin(v), d/2 cos(v) sin(u))
        surface_function = lambda u,v: (
            width/2 * cos(v) * sin(u) ,  # x
            height/2 * sin(v),          # y
            depth/2 * cos(v) * cos(u)   # z
        )

        super().__init__(
            u_start=0,
            u_stop=2*pi,
            u_resolution=radial_segments,
            v_start=-pi/2,
            v_stop=pi/2,
            v_resolution=height_segments,
            surface_function=surface_function
        )
Make sure there are no errors and save the file.
Since the width, height, and depth dimensions span across the entire object, we only apply half of their values to the coordinates of a unit sphere to get the final coordinates of the ellipsoid centered at the origin.
When we call the __init__ method of the superclass, we give our values for $u$ and $v$ for the ranges previously mentioned.
Here we can think of the radial_segments value as the number of triangles that each cross-section will be divided into, and the height_segments value is the total number of cross-sections.
Spheres
When we want to create a perfect sphere, it is useful to have a simpler interface than the one for an ellipsoid since the width, height, and depth of a sphere are all the same value.
![]() Try it!
Try it!
Inside the parametric_geometries.py file, add the following after the last code of the EllipsoidGeometry class:
class SphereGeometry(EllipsoidGeometry):
    """A perfect sphere with the given radius"""
    def __init__(self, radius=1, radial_segments=32, height_segments=16):
        super().__init__(
            width=2*radius,
            height=2*radius,
            depth=2*radius,
            radial_segments=radial_segments,
            height_segments=height_segments
        )
Make sure there are no errors and save the file.
Now when we use a SphereGeometry instance, we only need to give it a radius instead of three values for the width, height, and depth.
Cylindrical Geometries
A cylinder is not as complicated as a sphere because all of its cross-sections have the same radius. So, we can once again adopt the equations $x=r_c\cdot\sin(u)$ and $z=r_c\cdot\cos(u)$ where $0\le u\le 2\pi$. The $y$-coordinate will depend on the height $h$ of the cylinder and fall in the range of $-\frac{h}{2} \le y \le \frac{h}{2}$ for a cylinder centered at the origin. Then the $y$-coordinates can once again be defined by $v$, but this time the relationship is linear:
\[y=h\cdot \left( v - \frac{1}{2} \right) \text{, for } 0 \le v \le 1\]Now, if we allow the top of a cylindrical geometry to have a different radius than the bottom, then we can realize a wider range of geometries such as cones and pyramids. For a cone standing upright, the radius of the top cross-section is $0$ and the radius of the bottom cross-section is half the width. Given that our $v$ parameter expresses the $y$-coordinates from a range of values between $0$ and $1$, we can also use it to express the cross-section radius $r_c$. Since $v=0$ at the bottom, $v=1$ at the top, and all the points in between are on a straight line, then $r_c=s\cdot (1-v)$ where $s$ is the bottom radius.
What if the top cross-section also as a non-zero radius? In that case, we can express the cross-section radius $r_c$ relative to the top radius $t$ and a bottom radius $s$ as $r=t\cdot v + s\cdot (1-v)$ for $0 \le v \le 1$.
![]() Try it!
Try it!
Inside the parametric_geometries.py folder, add the following import statements just before the ParametricGeometry class.
from graphics.core.matrix import Matrix
from graphics.geometries.basic_geometries import PolygonGeometry
Scroll to the end of the parametric_geometries.py file and add the following code after the SphereGeometry class:
class CylindricalGeometry(ParametricGeometry):
    """A cylindrical object with the given top and bottom radiuses."""
    def __init__(self, top_radius=1, bottom_radius=1, height=1,
                       radial_segments=32, height_segments=4,
                       top_closed=True, bottom_closed=True):
        # the surface function calculates points on the surface
        # S(u,v) = ((vt + s(1-v))sin(u), h(v-0.5), (vt + s(1-v)cos(u)))
        surface_function = lambda u,v: (
            (top_radius * v + bottom_radius * (1-v)) * sin(u),
            height * (v - 0.5),
            (top_radius * v + bottom_radius * (1-v)) * cos(u)
        )

        super().__init__(
            u_start=0,
            u_stop=2*pi,
            u_resolution=radial_segments,
            v_start=0,
            v_stop=1,
            v_resolution=height_segments,
            surface_function=surface_function
        )
The CylindricalGeometry class has two new parameters: top_closed and bottom_closed.
As it is now, this geometry object will only render the rounded surface of the cylindrical object’s sides.
In order to render the top and bottom surfaces, we can use our PolygonGeometry class that we wrote earlier with a couple alterations.
First, we need the ability to transform the vertices of the geometry object.
We already did the work of creating transformation matrices with our Matrix class, so we should be able to apply those matrices to a Geometry object as well.
We also need a way to merge the attribute data of two different geometry objects so they can be handled as one.
Without this merge functionality, the top and bottom surfaces of cylinders would need to be separate mesh objects handled by the application, which is just more trouble for the programmer.
These are generic features that should not depend on the type of geometry, so let’s add them to the Geometry class.
In the graphics/geometries folder, open geometry.py for editing.
Scroll down to the bottom of the file and add the following method to the Geometry class:
    def apply_matrix(self, matrix, variable_name="vertexPosition"):
        """Transform the data in an attribute using the given matrix"""
        if variable_name not in self._attributes.keys():
            raise ValueError(f"Unable to apply matrix to unknown attribute: {variable_name}")

        old_position_data = self._attributes[variable_name].data
        new_position_data = []

        for old_pos in old_position_data:
            # copy the data and add a homogeneous fourth coordinate
            new_pos = old_pos + (1,)

            # apply the matrix
            new_pos = matrix @ new_pos

            # remove the homogeneous coordinate and append to the new data
            new_pos = new_pos[:3]
            new_position_data.append(new_pos)

        self.set_attribute(variable_name, new_position_data)
Remember that applying matrix transformations in 3D requires a fourth dimensional coordinate called the homogeneous coordinate.
Since Geometry instances do not store vertex data in 4D, we need to add one before applying the matrix.
In the code old_pos + (1,) we use a comma to indicate that we are creating a tuple with a single value.
If there is no comma, then it will be treated simply as the value 1 instead of a tuple.
Next add the following method to the Geometry class:
    def merge(self, other_geometry):
        """
        Merge data from attributes of other geometries into this object.
        Both geometries must share attributes with the same names.
        """
        for variable_name, attribute in self._attributes.items():
            attribute.data += other_geometry.attributes[variable_name].data
            self.set_attribute(variable_name, attribute.data)

        self.count_vertices()
Make sure there are no errors and save the file.
The merge method is pretty straightforward.
It loops through each variable in the self._attributes dictionary, gets data for the variable from the other geometry object, and then adds that data to its own variable before finally updating its vertex count.
Now we can complete the CylindricalGeometry class to give it top and bottom surfaces.
Open the parametric_geometries.py file again and add the following code to the end of the __init__ method of the CylindricalGeometry class:
        # add polygons to the top and bottom if requested
        if top_closed:
            top_geometry = PolygonGeometry(radial_segments, top_radius)
            rotation = Matrix.rotation_y(-pi/2) @ Matrix.rotation_x(-pi/2)
            transform = Matrix.translation(0, height/2, 0) @ rotation
            top_geometry.apply_matrix(transform)
            self.merge(top_geometry)

        if bottom_closed:
            bottom_geometry = PolygonGeometry(radial_segments, bottom_radius)
            rotation = Matrix.rotation_y(-pi/2) @ Matrix.rotation_x(pi/2)
            transform = Matrix.translation(0, -height/2, 0) @ rotation
            bottom_geometry.apply_matrix(transform)
            self.merge(bottom_geometry)
Make sure there are no errors and save the file.
We handle the top and bottom surfaces separately for maximum flexibility. For each one, we create a polygon with the same number of sides as the cylindrical geometry. Then we rotate it and translate it into position. Finally, we merge its data with this cylindrical geometry object.
Cylinders
Now that all of the hard parts are complete, cylinders are really easy to make.
The CylinderGeometry class is a simple interface for the CylindricalGeometry superclass that enforces an equal radius everywhere along its height.
![]() Try it!
Try it!
Inside the parametric_geometries.py file, add the following code after the CylindricalGeometry class:
class CylinderGeometry(CylindricalGeometry):
    """A cylindrical object with the same radius at the top and bottom"""
    def __init__(self, radius=1, height=1, radial_segments=32,
                       height_segments=4, top_closed=True, bottom_closed=True):
        super().__init__(
            top_radius=radius,
            bottom_radius=radius,
            height=height,
            radial_segments=radial_segments,
            height_segments=height_segments,
            top_closed=top_closed,
            bottom_closed=bottom_closed
        )
Make sure there are no errors and save the file.
When we make a cylinder with top_closed=False it will be a cup shape and when we also set bottom_closed=False it will be a tube shape.
We can also use CylinderGeometry to create prism shapes by changing the radial_segments parameter to a smaller value such as 3. This will decrease the number of sides and reduce the angles at each vertex, effectively replacing the curved appearance of the surface with flat sides and sharp angles.
Cones
Finally, we can extend the CylindricalGeometry class and give it specific parameters to create cone shapes.
A cone is unique in that its top radius is $0$ but its bottom radius can be any non-zero value.
As with cylinders, we create a simple interface to CylindricalGeometry in the __init__ method of the ConeGeometry class.
![]() Try it!
Try it!
Inside the parametric_geometries.py file, add the following code after the CylinderGeometry class:
class ConeGeometry(CylindricalGeometry):
    """A cylindrical object that comes to a point at the top"""
    def __init__(self, radius=1, height=1, radial_segments=32,
                       height_segments=4,  closed=True):
        super().__init__(
            top_radius=0,
            bottom_radius=radius,
            height=height,
            radial_segments=radial_segments,
            height_segments=height_segments,
            top_closed=False,
            bottom_closed=closed
        )
Make sure there are no errors and save the file.
The ConeGeometry class is also useful for creating pyramids. Simply set the radial_segments to a small number like 3 or 4 and the “cone” will actually be a pyramid!
Now you have a variety of new geometries in your toolbox for creating 3D scenes. Try using them to build something interesting, like a house or a toy!